![Nav Support Center.svg]](https://help.foodnotify.com/hubfs/Support%20Center/Design/Nav%20Support%20Center.svg)
You create an event in just a few steps. Then you use the tabs to plan everything your event needs – from the meals to the team.
Tip: Set up customers, events, templates and locations in the catering settings first. Then you only need to select them when you create an event.
Create an event
- Open Catering and click Create event.
- Enter the Event name and choose Begin and End.
- Choose Location, Event, Type and Customer.
- Under Guests, select a group (e.g. adults, children or crew) and enter the number. Use Add new to add more groups.
- Choose the Cost center and click Create.
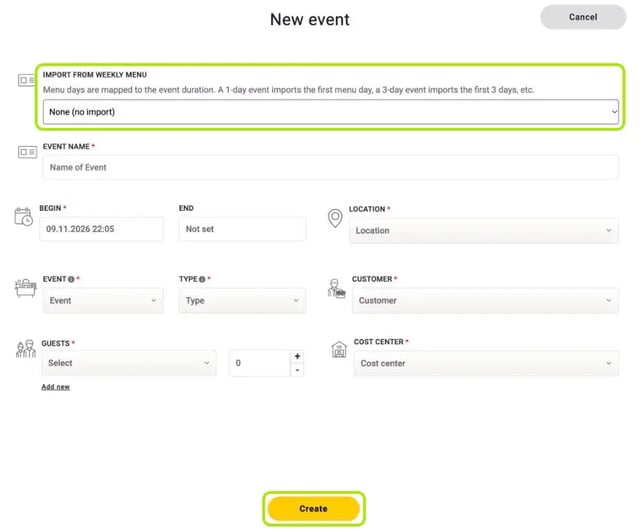
Import from weekly menu: At the very top you can select a weekly menu. FoodNotify maps its menu days to the duration of your event – a 1-day event takes the first menu day, a 3-day event the first three days, and so on. Learn more: How do I plan a weekly menu?
How an event is organized
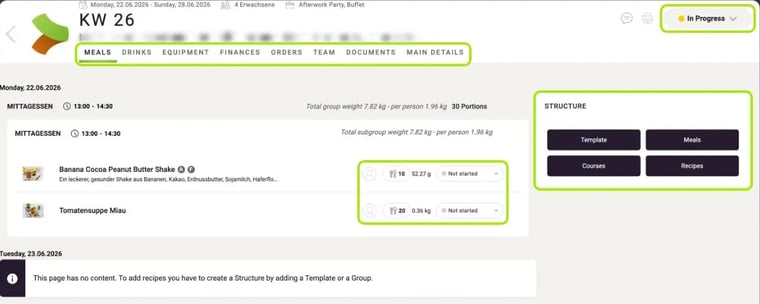
At the top you see the date, guests, event and type as well as the name, code, customer and location. At the top right you find the status and the printer icon. Below are the tabs:
- Meals – meals, courses and recipes
- Drinks – drinks for each meal
- Equipment – e.g. plates, cutlery and glasses
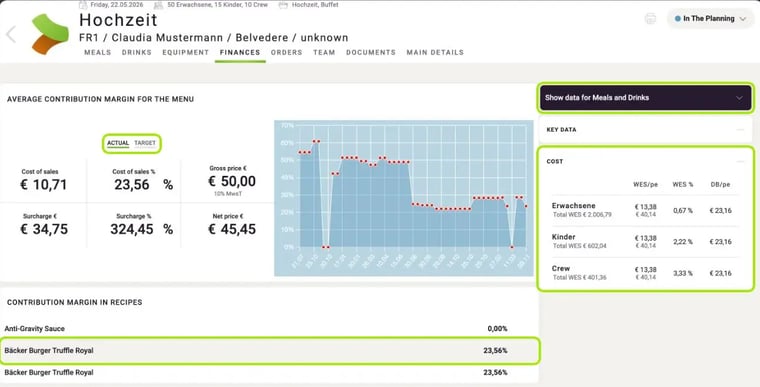
- Finances – cost of sales, prices and contribution margin
- Orders – all products you need for the event
- Team – who works at the event
- Documents – files for the event
- Main details – name, date, location, customer, guests and cost center
If an event lasts several days, it is organized by day.
Set the status
Click the status at the top right and choose In The Planning, Assigned, In Progress, Ready or Canceled. You edit meals, courses and recipes in the status In Progress.
Plan the meals
An event consists of meals (e.g. reception or lunch). Each meal contains courses (e.g. starter or main course), and your recipes go into the courses.
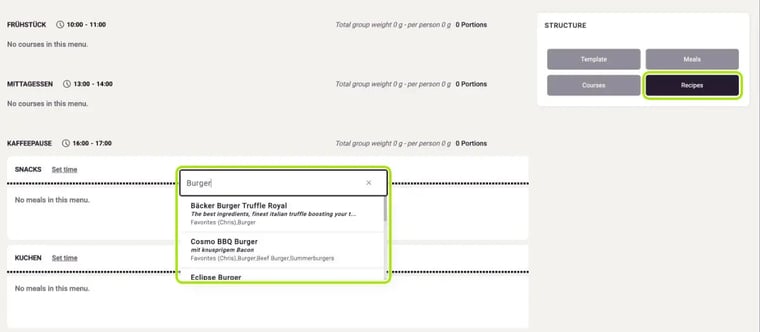
On the right, in the Structure panel, choose what you want to add:
- Template – adds all meals of a template, e.g. a wedding with reception and dinner.
- Meals – adds a single meal.
- Courses – adds a course to a meal.
- Recipes – adds recipes to a course.
Plus icons then appear in the right places. Click a plus, enter the name and select the entry from the list.
For each recipe you see portions, weight and progress: Not started, In preparation or Ready. With the person icon you link staff to the recipe. FoodNotify calculates the total weight and the weight per person for every meal and course automatically. With Set time you set the time of a meal or course.
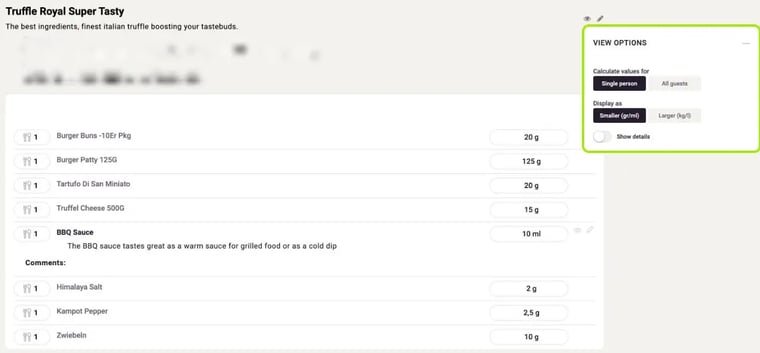
Click a recipe to open the detail view with all ingredients. Under View options you calculate quantities for a Single person or for All guests, choose smaller (g/ml) or larger units (kg/l) and use Show details to display further details such as sub-recipes.
Drinks
You plan drinks just like meals. So you don't have to create meals and courses again, click Copy structure in the Structure panel – FoodNotify then takes over the structure from the Meals tab. Note: an existing structure will be overwritten.
Equipment
In the Equipment tab you plan items such as plates, cutlery and glasses – also by meal and course. Copy structure helps here too. You select equipment from your products, so create it as a product first.
Finances
Under Contribution margin in recipes you see the cost of sales in percent for each recipe. Click a recipe: at the top you see cost of sales, cost of sales %, surcharge and the gross and net price – either Actual or Target – and next to it the cost of sales over time.
On the right you choose whether the figures apply to meals, drinks or both. Under Key data you find cost of sales and contribution margin as well as prices and discounts for the event, and under Cost the costs per guest group, e.g. adults, children and crew.
Orders
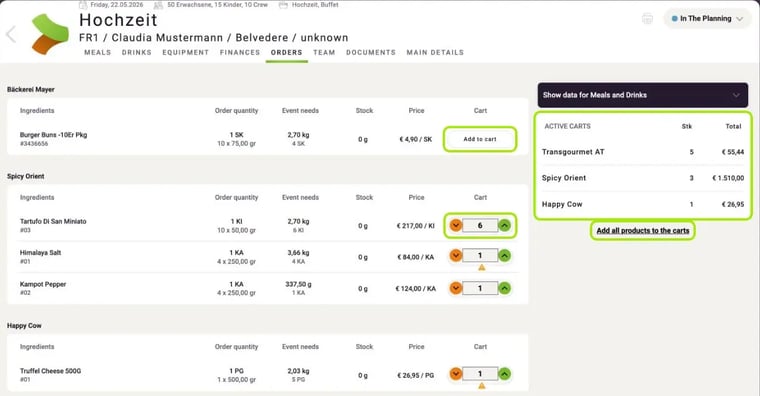
In the Orders tab FoodNotify lists all ingredients you need for the event – sorted by supplier, with order quantity, event needs, stock and price.
- Add to cart puts a product in the cart. You then adjust the quantity with the arrows.
- Add all products to the carts adds everything at once. Products that are already in a cart are not added twice.
- On the right, under Active carts, you see per supplier what is already in the cart.
A warning triangle shows you when the quantity in the cart differs from the quantity the event needs. You send the order from the cart as usual.
Team
In the Team tab you see your teams, e.g. kitchen, service or bar team. On the right, under Staff, you search for a person and drag and drop them into the right team.
Documents
In the Documents tab you store files for the event, e.g. quotes or schedules: click Choose, select the file and click Upload.
Change the main details
In the Main details tab you change the name, begin and end, location, event, type, customer, guests and cost center. Then click Save.
Good to know: If you change the number of guests, this affects all quantities you have already planned. If you change the date, FoodNotify moves meals and drinks from other days to the first group. In both cases FoodNotify asks you first.
Comments and printing
With the speech bubble at the top right you add a comment to the event. The printer icon opens the print view: select the recipes and click Print recipes or Print ingredients. With the switch at the top you take the number of guests into account for the portion sizes.