![Nav Support Center.svg]](https://help.foodnotify.com/hubfs/Support%20Center/Design/Nav%20Support%20Center.svg)
You connect your POS system for each location separately. Then you define which data the POS system sends to FoodNotify. Good to know: We set up the POS connection together with you as part of the implementation – this guide helps you with it.
Your POS systems at a glance
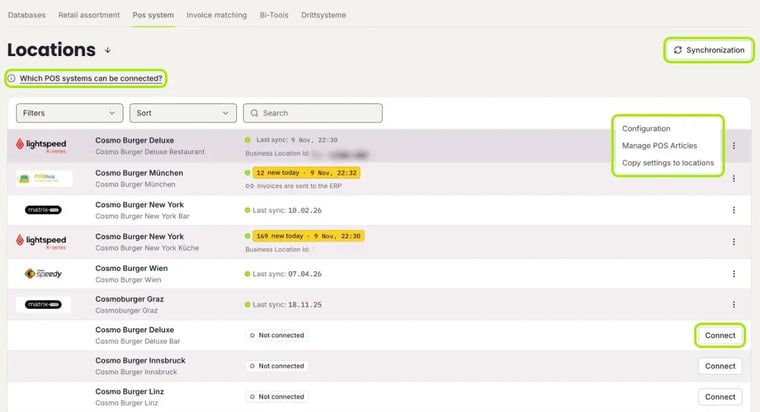
Click the gear icon at the top right and choose Service integrations › POS system. Under Locations you see all locations with their cost centers:
- Connected locations show the logo of their POS system and the status of the transfer – e.g. Last sync with date and time, or how many entries were added today.
- Locations that are not connected show Not connected and the Connect button.
With Filters, Sort and Search you find a location quickly. The three dots of a connected location open Configuration, Manage POS Articles and Copy settings to locations.
Connect your POS system
- Ask your POS provider for the access data for the connection.
- Click Connect next to the location you want.
- In the POS step, select your POS system and click Next.
- Follow the steps Connection and Finish. Depending on your POS system, you enter the data from your POS provider or sign in with the provider.
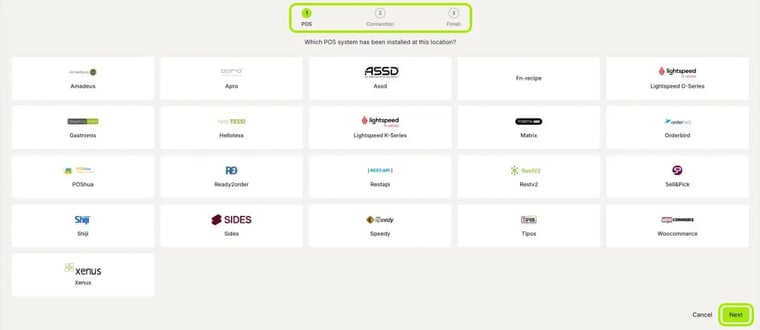
Depending on the amount of data, the first transfer can take a few minutes. Cancel closes the wizard without connecting anything.
How it works for Lightspeed G-Series (formerly Gastrofix): POS connection Lightspeed G-Series (Gastrofix)
Set up the synchronization
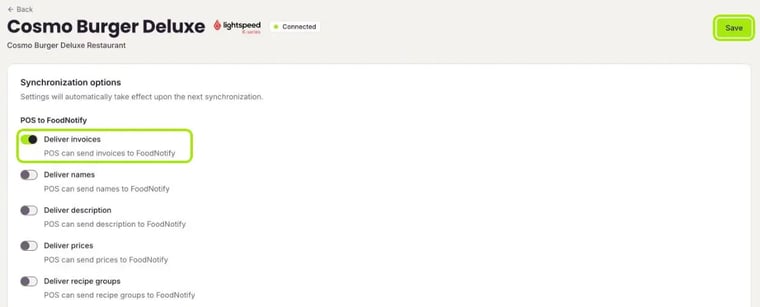
Click the three dots next to the location › Configuration. Under Synchronization options you define what your POS system may send to FoodNotify:
- Deliver invoices – the most important option: it transfers the quantities sold and the prices.
- Deliver names, Deliver description, Deliver prices and Deliver recipe groups – your POS system sends this information about its articles to FoodNotify.
Then click Save at the top right. The settings automatically take effect with the next synchronization.
Under Product groups you connect product groups of your POS system with this cost center; the data is then available at any time via the ERP module. To do so, click Connect with new product group. If you want to remove the connection to your POS system, you find Unlink location & POS at the very bottom.
Copy settings to other locations
If several locations use the same POS system, you don't have to set everything up twice. Click the three dots next to the location that is already set up › Copy settings to locations. FoodNotify then copies the configuration and the links between POS articles and recipes.
- Under Choose locations, select the target locations – one by one or with Select All.
- Define how products are matched. If your POS system doesn't provide reliable product numbers, FoodNotify matches by product name. With Allow approximate match when names differ slightly, small differences are recognized too, e.g. typos or “0.25l” and “25cl”. Ambiguous matches are skipped rather than guessed.
- Choose what happens to existing mappings at the target location: Merge (recommended) adds and updates, all other mappings stay. Replace all first deletes all mappings at the target location.
- Tick I understand the consequences and click Copy Settings.
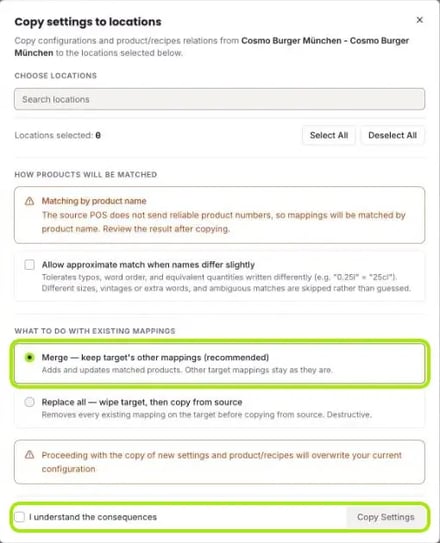
Important: The current configuration of the target locations is overwritten. Check the result after copying.
Synchronization by recipe
With Synchronization at the top right you see your recipes and their POS articles across locations. Under Filter, select at least one location. You then see the POS article of that location for every recipe and set it via the selection.