![Nav Support Center.svg]](https://help.foodnotify.com/hubfs/Support%20Center/Design/Nav%20Support%20Center.svg)
Recipes are at the heart of FoodNotify: from your suppliers' products, FoodNotify automatically calculates costs, cost of goods, allergens and nutritional values. Ideally, create your recipes after you have connected your suppliers – their products and prices are then already available as ingredients.
Tip for several locations: Create standard recipes once, centrally, in your own recipe database and then import them into your locations. This keeps every location up to date: How do I import recipes from the recipe database into my locations?
Create a new recipe
- Open Recipes › Recipes.
- Click Add new recipe at the top right.
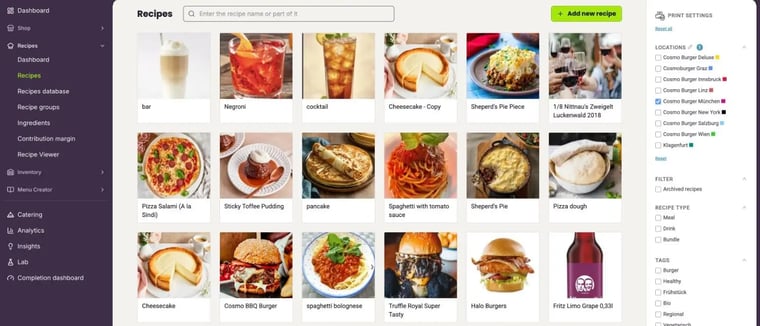
The overview shows all recipes as tiles. On the right, you filter by locations, archived recipes, recipe type, tags and groups.
Name, description, photo and type
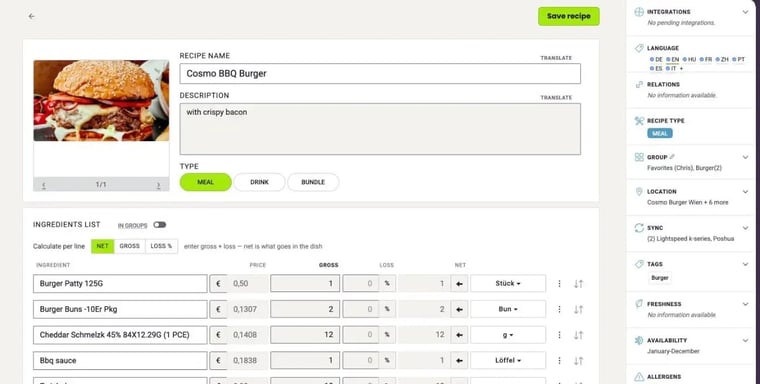
Give the recipe a Recipe name and, if you like, a Description. Upload a photo with Add photo so your team knows what the finished dish looks like. Then choose the Type: Meal, Drink or Bundle – a combination of several recipes, for example for a buffet. For meals and drinks, FoodNotify uses the VAT rates from your settings.
Add ingredients
- Click the Add new ingredient field.
- Type the name, a brand or the item number, for example tomatoes.
- Click the matching result. The ingredient is added to the recipe as a new line.
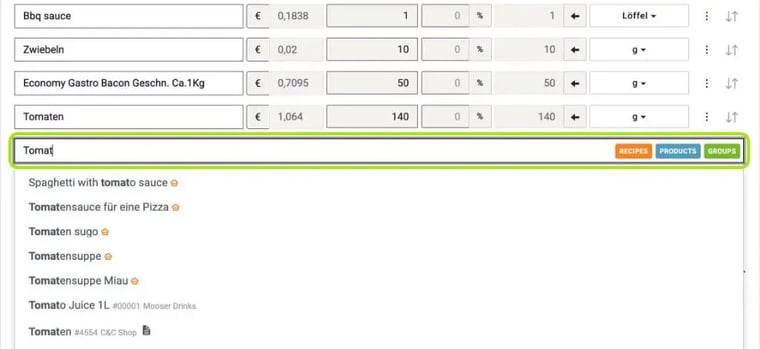
The results show your own recipes (with an orange icon) and the products of your connected suppliers with item number and supplier. The search finds names in the language you search in. With the buttons Recipes, Products and Groups on the right of the field, you choose where to search.
You can also use your own recipes as an ingredient, for example a homemade sauce. FoodNotify then takes costs, allergens and nutritional values from that recipe automatically.
If you can't find an ingredient, create it yourself with Add own new ingredient. You are responsible for the accuracy of the data of your own ingredients.
Quantity: gross, loss and net
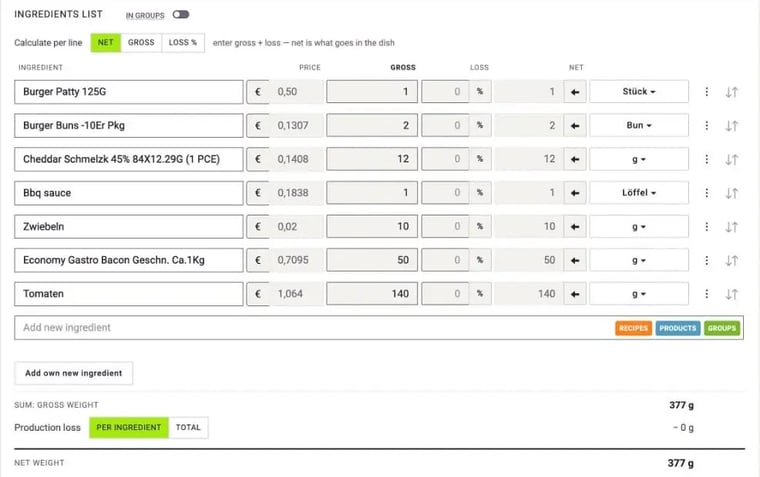
For each ingredient you see Price, Gross, Loss and Net:
- Gross is the quantity you buy and process.
- Loss is the percentage that is lost when cleaning, peeling, frying or cooking.
- Net is what ends up in the dish.
With Calculate per line, you decide which value is calculated automatically. If the switch is set to Net, you enter gross and loss, and FoodNotify calculates the net quantity.
Click % next to the loss to enter a value or choose a template such as vegetable trimming loss: How do I create loss templates?
Below the ingredients list you see the sum of the gross weight, the recipe loss and the Net weight. For the loss, you choose whether it is calculated Per ingredient or for the whole recipe.
Units
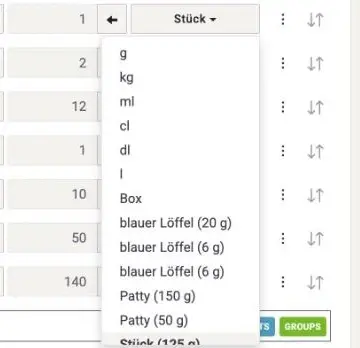
Next to the quantity you choose the unit. Besides g, kg, ml, cl, dl and l, you find the ingredient's Own units, for example Patty (150 g), and your Global recipe units, for example spoon (20 g). This is how you create units: How do I create global and custom units for recipes?
Replace an ingredient, view it in the shop or remove it
With ⋮ at the end of a line, you can Replace the ingredient, open it with Go to shop or Remove it from the recipe. Use the arrows next to it to change the order of the ingredients.

Enter your own purchase price
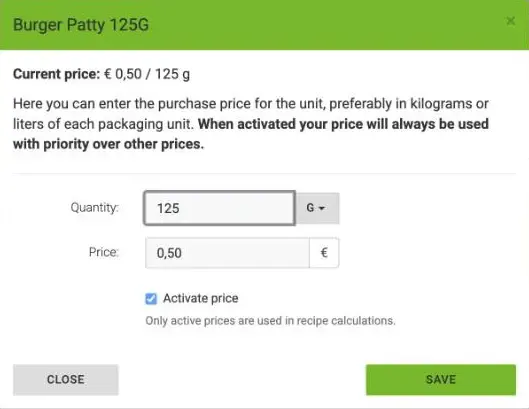
FoodNotify takes the price of an ingredient from your supplier's data. If you want to calculate with your own purchase price, click € in front of the price. Enter Quantity and Price, tick Activate price and click Save. An active price of your own always takes priority over the shelf or average price.
Portion size and servings
For the Portion size, FoodNotify calculates automatically with the net weight by default. Under Servings, enter how many portions the recipe is meant for.
The sales price applies to the whole recipe. If you sell items individually, such as muffins or slices of cake, create the recipe for one piece and enter 1 under Servings. Otherwise, cost of goods and contribution margin will be wrong.
Sales price and POS ID
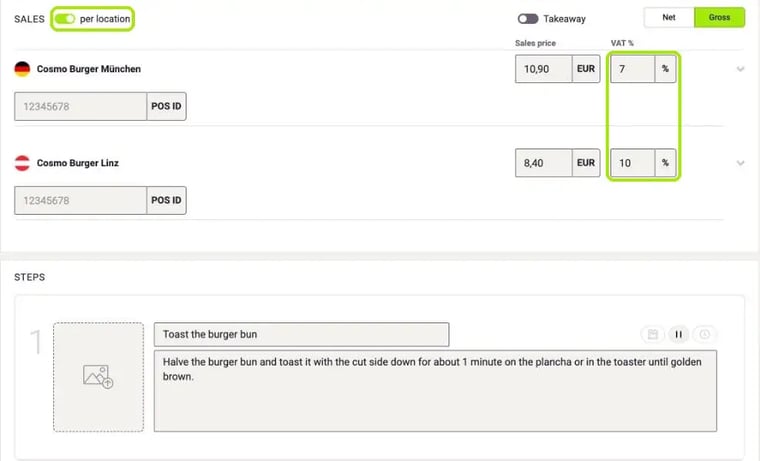
Under Sales price, enter the price for all locations. If you activate per location, you set a separate price for each location. You enter the Inhouse price and, if needed, the Takeaway price; FoodNotify suggests the VAT from your settings, and you can change it for each recipe and location. In POS ID, you link the recipe to the matching item in your POS system.
If you have locations in more than one country, activate per location. Without it, all locations use the same VAT rate, although rates differ by country, for example 7 % for food in Germany and 10 % in Austria.
The arrow on the right of the price line opens the contribution margin calculator: How do I keep track of contribution margin and cost of goods?
Preparation, comments and tips
Under Steps, describe each work step: title, text, photo and duration. Add more steps with New step; FoodNotify adds up the total time. At the very bottom, Comments & HowTos gives you room for notes, for example on plating or serving.
The sidebar on the right
- Language: maintain the recipe in other languages – How do I translate my recipes?
- Recipe type and Group: the type and recipe groups of the recipe – How do I create recipe groups?
- Location: in which locations the recipe is used
- Sync: which POS systems the recipe is connected to
- Tags, Freshness and Availability – in which months the recipe is offered
- Allergens, Additives, Average nutritional values and Weight: calculated from your suppliers' product data
- Environmental evaluation: the carbon footprint of your recipe
If allergens or nutritional values are missing, your supplier doesn't provide this data: Why are product data, prices or other details not displayed correctly?
Save
Click Save recipe at the top right. After that, you can open the recipe at any time via its tile in the recipe overview.
Edit recipes with Claude
If FoodNotify is connected to Claude, Claude can also edit recipes for you: preparation steps and step photos, comment, ingredient lines, tags, images, servings and locations, in all recipe languages. Claude finds supplier items by name or item number.
Describe in plain language what Claude should change, then check the result in the recipe. More about the MCP server: AI in FoodNotify